

Sciatic nerve pain, that sharp, radiating discomfort shooting down your leg, can be debilitating, making even simple tasks feel impossible. While rest might seem like the only answer, targeted movement is often the key to unlocking lasting relief. However, not all stretches are created equal. The wrong movement can easily worsen inflammation and nerve compression, while the right one can provide immediate relief and promote long-term healing.
This guide is designed to cut through the noise, offering an evidence-based roundup of the most effective, chiropractor-approved stretches. We will explore not just what to do, but why each stretch works, how to perform it safely, and crucially, when it's time to seek professional care from a specialist. This isn't just another list; it's a strategic plan to help you reclaim control over your body, reduce pain, and get back to living life on your terms.
We will break down each of the 8 best stretches for sciatica relief with detailed instructions, common mistakes to avoid, and essential modifications for every level of flexibility and pain. You will gain a clear understanding of movements that target key muscles like the piriformis, hamstrings, and glutes, which are often implicated in sciatic nerve irritation. Our goal is to empower you with specific, actionable techniques that you can implement immediately to start your journey toward a pain-free life.
The Piriformis Stretch, often performed as a lying figure-4, is a cornerstone of any effective routine for sciatica relief. This stretch specifically targets the piriformis, a small but powerful muscle located deep within the gluteal region. Its importance stems from its proximity to the sciatic nerve; in many individuals, the nerve passes directly underneath or even through this muscle. When the piriformis becomes tight or inflamed, it can compress the nerve, causing a condition known as piriformis syndrome, which mimics the radiating pain of sciatica.
This targeted stretch helps to release tension in the piriformis, creating space and alleviating pressure on the sciatic nerve. By gently elongating the muscle fibers, you can reduce the irritation that leads to pain, numbness, and tingling down the leg. This makes it one of the best stretches for sciatica relief, especially when the root cause is muscular tightness rather than a spinal issue like a herniated disc.
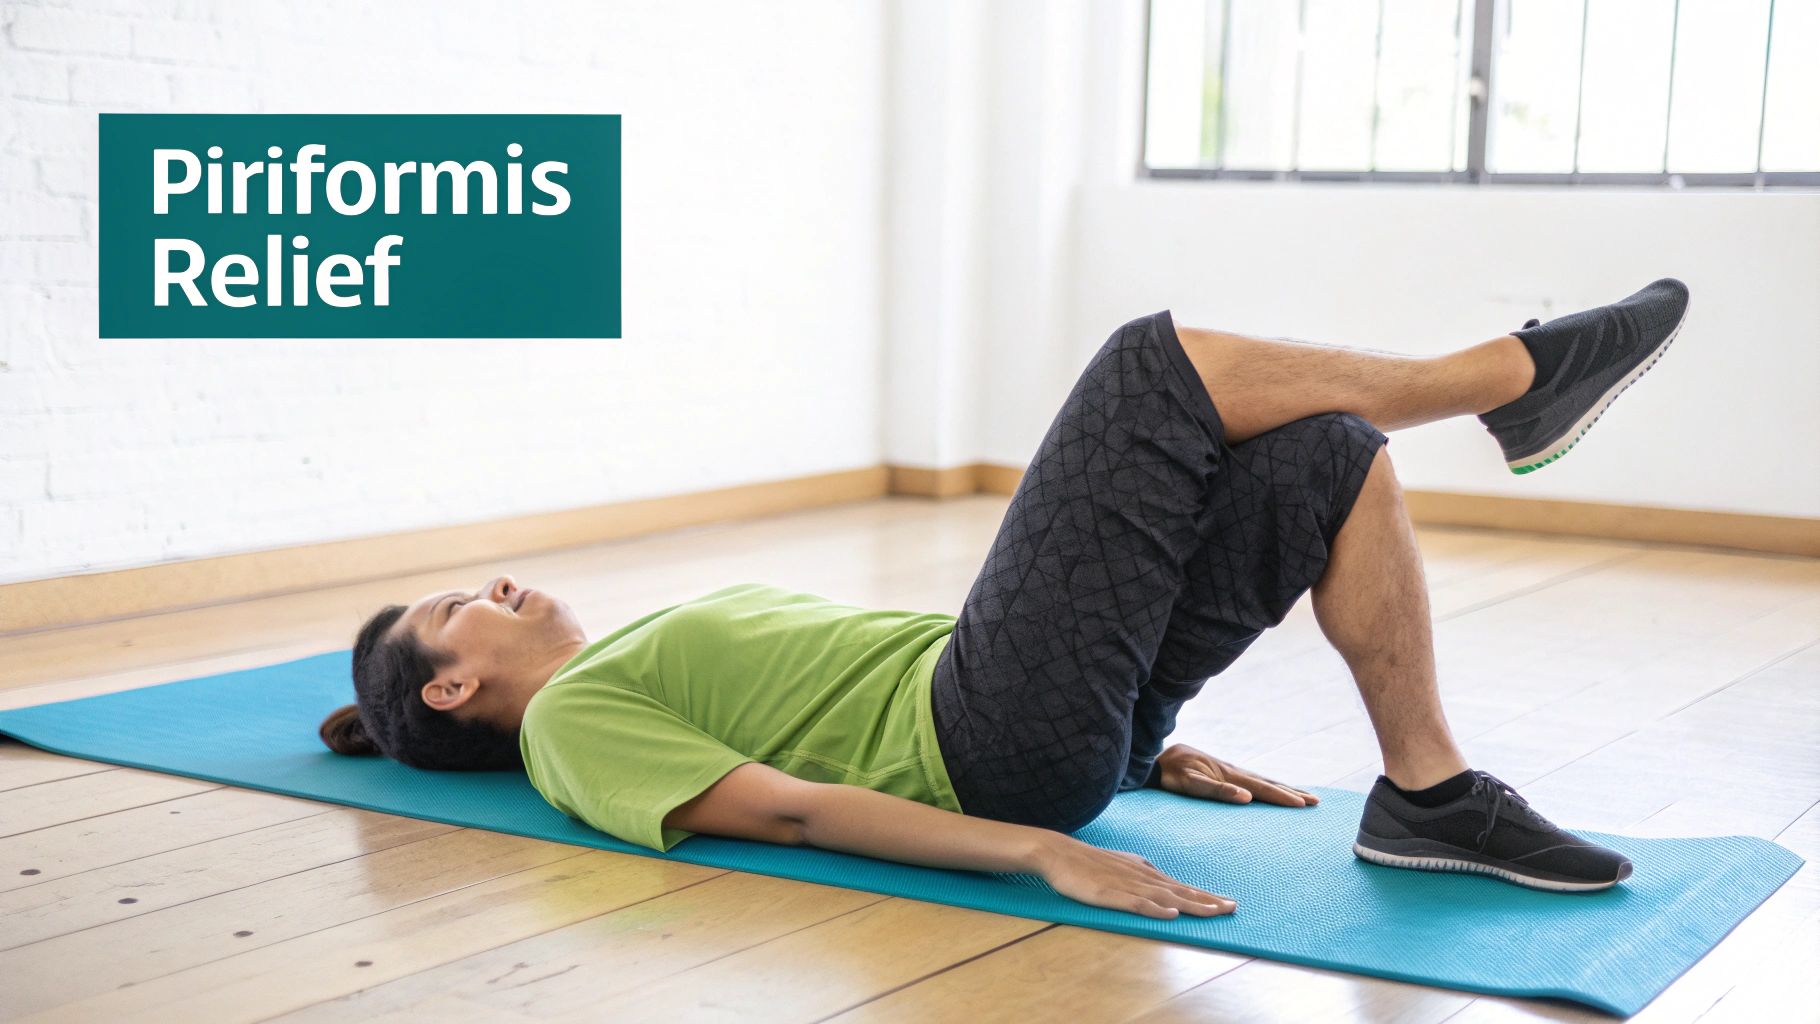
When to Seek Professional Care: If you experience sharp, shooting pain during this stretch or your symptoms worsen, stop immediately. Persistent sciatica, especially when accompanied by muscle weakness or changes in bowel or bladder function, requires professional evaluation. A chiropractor can diagnose the root cause of your sciatica, which may be piriformis syndrome. You can explore how a chiropractor can help with this specific condition and find more information about piriformis syndrome and chiropractic care.
The hamstring stretch is a fundamental exercise for managing sciatica pain, targeting the large group of muscles running along the back of your thigh. Tight hamstrings are a frequent contributor to sciatic nerve irritation because they pull on the pelvis, which can alter spinal mechanics and increase tension on the lower back. This constant pulling can directly aggravate the sciatic nerve root, leading to the characteristic pain that radiates down the leg.
By regularly performing a hamstring stretch, you can lengthen these muscles, which helps to relieve this posterior tension and restore proper pelvic alignment. This process reduces the mechanical stress on your lower back and, in turn, alleviates the compression and irritation of the sciatic nerve. For this reason, physical therapists and chiropractors often prescribe hamstring stretches as a first-line, non-invasive treatment for sciatica, making it one of the best stretches for sciatica relief.
When to Seek Professional Care: If the stretch causes sharp or radiating pain, stop immediately. While hamstring tightness is a common cause of sciatic-like symptoms, it's crucial to get an accurate diagnosis. A chiropractor can determine if your pain stems from a muscular issue, a herniated disc, or another spinal condition and can create a targeted treatment plan for lasting relief.
Unlike stretches that target muscle tightness, sciatic nerve gliding exercises are designed to gently mobilize the sciatic nerve itself. This neurodynamic approach helps the nerve slide more freely through its surrounding tissues, reducing irritation, inflammation, and adhesions that can cause pain. The Slump Stretch is a classic nerve gliding technique that encourages this movement, helping to alleviate the neural tension often at the core of sciatic symptoms.
These exercises are crucial because they directly address the nerve, which can become "stuck" or compressed by muscles, bones, or disc material. By carefully and progressively moving through a series of positions, you can improve the health and mobility of the nerve, desensitizing it over time. This makes nerve gliding one of the best stretches for sciatica relief, particularly when symptoms are caused by nerve entrapment or irritation along its pathway.
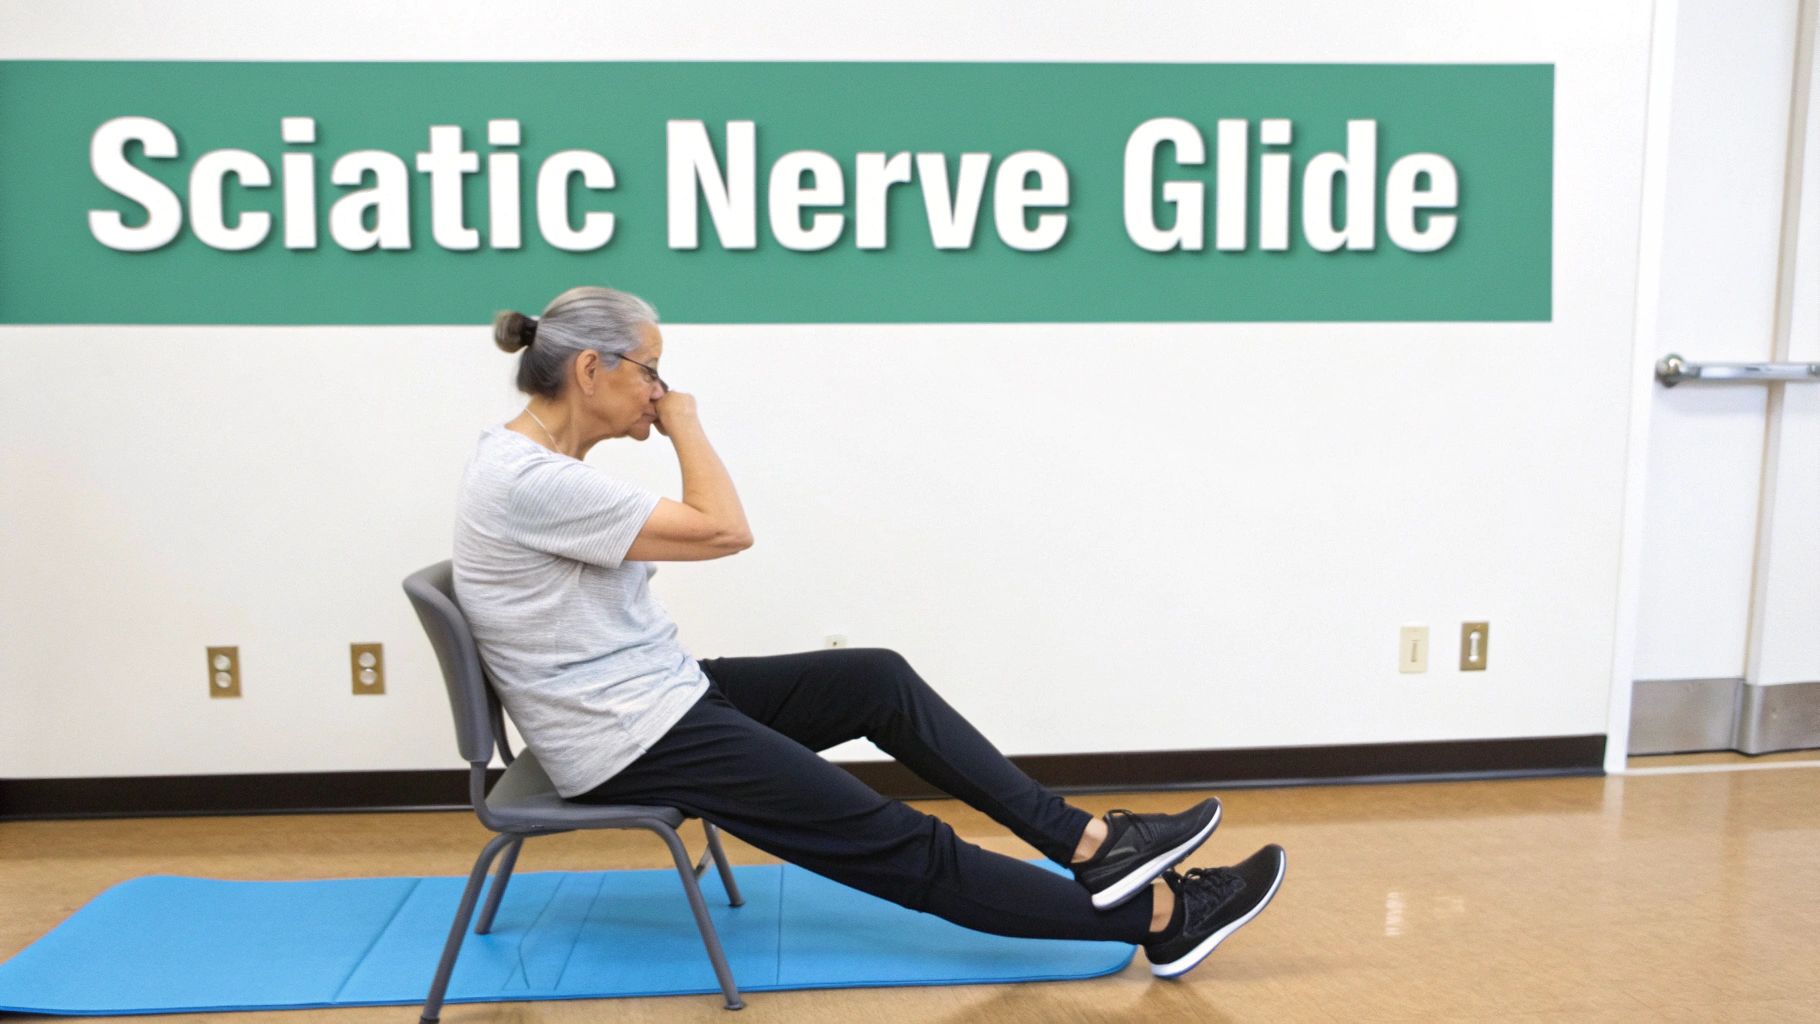
When to Seek Professional Care: If this exercise increases your radiating leg pain, numbness, or tingling, stop immediately. Nerve gliding should be gentle. A chiropractor can properly assess your condition to ensure this exercise is appropriate for you. Understanding the complexities of nerve pain is essential for effective relief, and you can find comprehensive information about the best treatment for nerve pain and how professional care can guide your recovery.
The Spinal Twist, particularly when performed in a supine or reclined position, is a highly effective stretch for alleviating lower back and hip tightness associated with sciatica. This movement introduces gentle rotation to the lumbar spine, which can help relieve pressure on the nerve roots and improve the mobility of the spinal joints. By combining this twist with hip flexion, the stretch also targets the gluteal muscles and the piriformis, which can directly compress the sciatic nerve.
This rotational movement is crucial because it addresses both muscular tension and joint stiffness. It helps create space between the vertebrae, which is particularly beneficial if the sciatica is caused by conditions like a herniated disc or spinal stenosis. By gently stretching the muscles that support the spine and hips, this stretch can reduce the mechanical stress that contributes to nerve irritation, making it one of the best stretches for sciatica relief.
When to Seek Professional Care: If this stretch causes sharp pain or increases your sciatic symptoms, stop immediately. It's crucial to have a proper diagnosis, as sciatica can stem from various causes. A chiropractor can determine if the issue is a disc herniation or another spinal condition. For more information, you can read about options for non-surgical disc herniation treatment.
The Glute and Hip Flexor Stretch, widely known as the Couch Stretch, is a powerful tool for alleviating sciatic nerve pain by addressing two critical muscle groups simultaneously: the glutes and the hip flexors. Tightness in these areas is a common contributor to pelvic misalignment and lower back tension, which can directly irritate the sciatic nerve. The hip flexors, particularly the iliopsoas, can pull the pelvis forward when tight, increasing the curve in the lower back and compressing spinal structures.
This stretch effectively lengthens the hip flexors of the back leg while also engaging the gluteal muscles of the front leg. By restoring balance and flexibility across the hips, the Couch Stretch helps to normalize pelvic posture and reduce mechanical stress on the lumbar spine. This makes it one of the best stretches for sciatica relief, especially for individuals who spend long hours sitting, which shortens the hip flexors and weakens the glutes.

When to Seek Professional Care: This is an intense stretch. If you feel a sharp pain in your knee, hip, or lower back, stop immediately. Sciatica that doesn't improve with stretching or is accompanied by severe weakness requires a proper diagnosis. A chiropractor can assess your pelvic alignment and hip mobility to determine if muscular imbalances are the source of your nerve pain and provide targeted adjustments to correct them.
Child's Pose is a foundational resting posture in yoga known for its ability to gently lengthen the spine and calm the nervous system. When modified specifically for sciatica relief, it becomes an incredibly effective tool for creating space in the lower back and decompressing spinal nerves. The standard pose can sometimes aggravate sciatica if it involves too much lumbar flexion, but the modified version prioritizes gentle traction and hip opening, which is key.
This variation involves widening the knees, allowing the torso to rest comfortably between the thighs. This small adjustment shifts the focus from deep spinal flexion to a gentle elongation of the lumbar spine and a mild stretch of the hip rotators and gluteus minimus. By creating this space, the pose can help alleviate pressure on the sciatic nerve roots as they exit the spine, making it one of the best stretches for sciatica relief when active, intense movements are too painful.
When to Seek Professional Care: While gentle, this stretch may not be suitable for everyone. If you feel a sharp increase in pain or a worsening of your radiating symptoms, stop immediately. A professional evaluation is crucial to ensure you are doing the right exercises for the specific cause of your sciatica. A chiropractor can provide a precise diagnosis and develop a personalized treatment plan that addresses the underlying issue, whether it's spinal or muscular in origin.
Supine pelvic tilts are a foundational exercise that combines a gentle stretch for the lower back with crucial core muscle activation. While many sciatica relief strategies focus on stretching tight muscles, pelvic tilts address the equally important aspect of stability. They work by teaching you to control your pelvic position, which directly influences the curvature of your lumbar spine and reduces stress on the structures that can irritate the sciatic nerve.
This subtle movement is highly effective because it activates the deep abdominal muscles, such as the transverse abdominis, which act as a natural corset for your spine. By strengthening these core stabilizers, you can reduce excessive lumbar lordosis (an over-arched lower back), a common postural issue that contributes to sciatica. Unlike passive stretching, pelvic tilts build functional stability, making them one of the best exercises for creating long-term resilience against sciatica flare-ups.
When to Seek Professional Care: This exercise should feel gentle and relieving. If you experience any sharp pain or an increase in your sciatic symptoms, stop immediately. A chiropractor can properly assess your spinal alignment and core function to determine why your sciatica is occurring. They can integrate exercises like pelvic tilts into a comprehensive treatment plan that addresses the root cause of your pain.
The Knee to Chest Stretch is a fundamental and highly accessible exercise for managing lower back pain and sciatica. This gentle stretch directly addresses the lumbar spine, helping to decompress the vertebrae and open up the neuroforamen, the small openings through which spinal nerves, including the sciatic nerve, exit the spinal column. By reducing excessive inward curvature of the lower back (lordosis), it can alleviate pressure on irritated nerve roots and intervertebral discs.
This stretch is particularly valuable because it offers two variations to suit different levels of pain and flexibility. The double-leg version provides a general, supportive stretch for the entire lower back, while the single-leg variation allows for a more focused elongation of the gluteal and piriformis muscles on one side. This makes the Knee to Chest stretch one of the best stretches for sciatica relief, as it can be easily adapted to provide immediate, gentle relief during acute flare-ups.
When to Seek Professional Care: If this stretch causes a sharp increase in pain or sends symptoms shooting down your leg, stop immediately. While gentle stretching is beneficial, persistent or severe sciatica requires a proper diagnosis to address its underlying cause, such as a disc herniation. A chiropractor can provide a thorough evaluation and create a targeted treatment plan to ensure you are performing the right exercises for your specific condition.
| Stretch / Exercise | Implementation complexity | Resource requirements | Expected outcomes | Ideal use cases | Key advantages |
|---|---|---|---|---|---|
| Piriformis Stretch (Lying Figure-4) | Low — simple form but requires proper alignment | Yoga mat or padded surface; minimal instruction | Reduces piriformis tension and nerve compression; possible relief within weeks | Piriformis-related sciatica; safe with disc issues | Directly targets source of compression; modifiable; often provides immediate relief |
| Hamstring Stretch (Standing or Seated) | Low — easy variations; consistency needed | None; optional strap or towel | Decreases posterior chain tension; improves flexibility over weeks | Tight hamstrings, posterior chain contributors to sciatica, disc-related cases | Highly accessible; safe to repeat daily; foundational for sciatica programs |
| Sciatic Nerve Gliding (Slump Stretch) | Moderate — neurodynamic technique requires instruction | Chair and clinician guidance recommended | Improves neural mobility; reduces nerve adhesions over 4–8 weeks | Nerve-dominant sciatica and neurodynamic restrictions | Specifically targets neural tension; progressive and adaptable |
| Spinal Twist (Supine Figure-4 with Rotation) | Low–moderate — requires controlled rotation awareness | Mat or padded surface | Enhances spinal mobility; reduces lumbar/SI stiffness | Spinal stiffness, facet or sacroiliac-related symptoms | Combines spinal rotation with hip stretch; reveals asymmetries |
| Glute & Hip Flexor Stretch (Couch Stretch / Supported Lunge) | Moderate — setup and posture control required | Couch, chair, or elevated surface; mat | Improves hip mobility and pelvic alignment over weeks | Sedentary/desk workers; hip-flexor dominance contributing to sciatica | Targets often-neglected hip flexors and glutes; improves hip mechanics |
| Child's Pose (Modified for Sciatica) | Very low — gentle, easy to perform | None; optional blankets or blocks | Gentle spinal decompression and calming; supports acute relief | Acute or nerve-sensitive sciatica; post-adjustment holding position | Extremely gentle and well-tolerated; can be held for extended periods |
| Supine Pelvic Tilts (Activation & Stability) | Low — requires motor control practice | Mat; progression to other equipment as needed | Builds core activation and lumbar stability over weeks | Core weakness, maintenance after adjustments, prevention | Teaches spinal alignment and proprioception; foundational for rehabilitation |
| Knee-to-Chest Stretch (Double & Single Leg) | Very low — simple to perform | Mat or padded surface | Immediate lumbar unloading and gentle decompression | Acute flare-ups and initial home care | Safe and scalable; provides prompt relief and identifies side-specific pain |
You now have a detailed roadmap featuring eight of the most effective and research-supported stretches for sciatica relief. From the targeted Piriformis Stretch designed to release deep gluteal tension to the gentle mobilization of Sciatic Nerve Gliding, each movement serves a specific purpose. We’ve explored not just the "how" but the "why" behind each stretch, providing step-by-step instructions, common mistakes to avoid, and crucial modifications to ensure safety and effectiveness for every fitness level.
Remember, the goal is not to force a movement but to gently encourage mobility and reduce nerve compression over time. Consistency is the engine of progress. Integrating even a few of these stretches, like the foundational Supine Pelvic Tilts and the universally beneficial Knee to Chest Stretch, into your daily routine can create a powerful cumulative effect, reducing inflammation, improving flexibility, and restoring pain-free function.
Mastering these stretches is a significant and empowering step toward taking control of your health. You are actively participating in your own recovery, building body awareness, and creating a more resilient musculoskeletal system. This proactive approach is invaluable, as it helps manage flare-ups and can prevent future episodes of sciatic pain.
However, it's critical to recognize that while stretching is a powerful tool, it is often one piece of a larger puzzle. Sciatica is a symptom, not a diagnosis. The radiating pain you feel is the result of the sciatic nerve being compressed or irritated somewhere along its path, which could stem from various underlying conditions:
Performing the best stretches for sciatica relief can alleviate the tension and pressure contributing to your symptoms, but it may not resolve the root structural or mechanical issue. This is where professional guidance becomes essential.
Ignoring persistent or worsening symptoms can lead to chronic pain and potentially irreversible nerve damage. If your sciatica is severe, accompanied by significant weakness, numbness in the legs or feet, or changes in bowel or bladder function, seeking immediate professional care is non-negotiable. Even for less severe but persistent cases, a precise diagnosis is the key to unlocking a truly effective and lasting solution.
A "one-size-fits-all" stretching routine, while beneficial, cannot compare to a targeted treatment plan based on a comprehensive diagnostic evaluation. Attempting to manage a disc herniation with the same strategy as piriformis syndrome, for instance, could be ineffective or even counterproductive.
At Bonesetters, we move beyond symptom management. We utilize advanced diagnostic tools to pinpoint the exact source of your nerve impingement. This allows us to create a highly specific, evidence-based treatment protocol that may integrate specialized therapies like non-surgical spinal decompression to gently relieve pressure on your discs, PulStar computer-guided adjustments for precise spinal alignment, and Class IV laser therapy to accelerate tissue healing and reduce inflammation at a cellular level.
Your home stretching routine, featuring the very movements detailed in this guide, becomes a synergistic component of this professional care plan. We guide you on which stretches are most appropriate for your specific condition, ensuring your efforts at home directly support and enhance the targeted treatments you receive in our clinic. This integrated approach is the cornerstone of achieving not just temporary relief, but long-term resolution and a return to the activities you love.
Ready to move beyond temporary fixes and address the root cause of your sciatica? Combine your knowledge of the best stretches for sciatica relief with our expert care at Bonesetters Critical Chiropractic. Visit Bonesetters Critical Chiropractic to schedule a comprehensive evaluation and discover how our advanced, non-surgical treatment protocols can provide lasting relief.